So you just bought a brand new drone. You are all excited, you unwrap the packaging and charge up the batteries and insert your micro SD card. You watched videos and took and passed your FAA 107 exam. You get your drone up in the air over a beautiful landmark. You start to snap photos and start playing with video. The footage looks amazing on your 7-inch smartphone screen, but when you get home on your computer, you start to notice the issues…
This could be propeller blades in your tracking shot… The all too dreaded “jello effect” where your footage is filled with ripples… Or you are picking up heavy reflections over the water and the sky looks washed out. These are all issues that plague first time drone operators.
I know it can be exciting to get your drone up in the air. However, it can be even more exciting to get that perfect photo or crisp 4K video footage.
This past week, Tiffen launched Drone Filters for the DJI™ Mavic 2 Pro, DJI™ Mavic 2 Zoom, DJI™ Mavic Air& DJI™ Inspire 2. While we are excited to get these filters in the hands of aerial imagemakers, we wanted to give you a quick breakdown on some of our Frequently Asked Questions.
Why use an ND Filter on a Drone?
On certain drones such as the DJI™ Mavic Air or DJI™ Mavic 2 Zoom, the Aperture of the camera is locked at F2.8, meaning the only way successfully maintain proper exposure is to increase your shutter speed. This increase in shutter speed will often time result in what is known as the “jello effect”, or to simply put it, shaky footage. Depending on the angle you are filming at your camera may even pick up the edge of your propeller blades, leaving you with an obstructed view and choppy footage. This footage can be incredibly difficult to edit, even considered unusable.

Newer, Professional level drones, such as the DJI™ Inspire 2 or DJI™ Mavic 2 Pro give operators the ability to manually adjust aperture settings, allowing you to achieve cinematic shutter speeds, as well as a more professional look. While these exciting new opportunities for filming at a slower shutter speed broaden one’s potential for image capture, they can also present the challenge of maintaining proper light balance. In order to help combat this potential overexposure of light, a Neutral Density filter can now be placed and regularly used on one’s drone camera.
By using a Neutral Density Filter, a certain amount of light will be blocked from reaching your sensor. By limiting the amount of light that comes in contact with the sensor, you will be able to film at slower shutter speeds, while keeping a lower aperture, helping you to successfully achieve a cinematic look.
What is the recommended shutter speed for filming on a drone?
In cinema, the standard frame rate is 24 frames per second (FPS). The best way to determine your shutter speed is to double your FPS. Most of the new drones on the market give you the ability to film at 24FPS
24FPS – Recommended Shutter Speed 1/50th of a second
30FPS – Recommended Shutter Speed 1/60th of a second
60FPS – Recommended Shutter Speed 1/120th of a second
120FPS – Recommended Shutter Speed 1/240th of a second
Should I worry about Shutter Speed if I’m primarily capturing Still Images?
Slowing down your shutter speed will allow you to blur movement in the scene, just like landscape photographers do with long exposures. Some drones give you the ability to use “tripod mode”, which hovers the aircraft pretty still. So having a shutter speed of 1/30th or below can yield some interesting results.

What ND Filter should I use?
When you set your desired frame rate (FPS), you should then try to reach the appropriate recommended shutter speed listed above.
Example.) It is a bright sunny day with only a few clouds in the sky. You would like to film at 24FPS. Your drone’s sensor determined that your recommended shutter speed is 1/1000th of a second. This shutter speed is too high for cinematic results.
To achieve the cinematic look, you are going to want to add an ND Filter to your drone’s camera lens.

To get down to the recommended shutter speed of 1/50 th of a second, you would want to add a 4 Stop (ND 16) Filter. This will cut the amount of light by 4 stops before reaching the camera’s sensor, allowing you to achieve cinematic settings.
| Filter | Stops | Best Uses |
| Sky 1-A | 0 | Haze Reduction & Protection. Can be kept on your lens at all times. |
| Circular Polarizer | 1.5 | Contrast Enhancement and Removing Reflections/Glare off of metallic surfaces such as water or metal. |
| 0.3 (ND2) | 1 | Early morning or late evening flights when conditions are not overly bright. |
| 0.6 (ND4) | 2 | Early morning or late evening flights when conditions are not overly bright. |
| 0.9 (ND8) | 3 | Cloudy conditions or when your shutter speed is at 1/500th |
| 1.2 (ND16) | 4 | Bright conditions or during partly cloudy days. Or when your shutter speed is at 1/1000th |
| 1.5 (ND32) | 5 | Bright conditions or during partly cloudy days. Or when your shutter speed is at 1/2500th |
| 1.8 (ND64) | 6 | Extremely bright conditions. Or when your shutter speed is at 1/4000th. |
| 2.1 (ND128) | 7 | Extremely bright conditions. Or when your shutter speed is beyond 1/6400th. |
| 2.4 (ND256) | 8 | Extremely Bright Conditions: Not Currently Available in Drone Sizes |
| 2.7 (ND512) | 9 | Extremely Bright Conditions: Not Currently Available in Drone Sizes |
| 3 (ND1024) | 10 | Extremely Bright Conditions: Not Currently Available in Drone Sizes |
Why use a Polarizer on a drone?
Think of a polarizer as sunglasses for your drone. Polarizing filters provide color and contrast enhancement. Often times, reflected light shows up as whitish glare that washes out the color in an image. A polarizing filter corrects this problem by producing deep, dramatically blue skies, making clouds pop off the background. This filter will also remove glare from non-metallic surfaces, such as windows and water. Color saturation in general, especially outdoors, can also be significantly improved by using polarizing filters.

An ND/PL Combo is the best of both worlds. It allows you to cut the glare and reflections off of water and metallic surfaces, as well as giving you the ability to lower your shutter speed for cinematic results

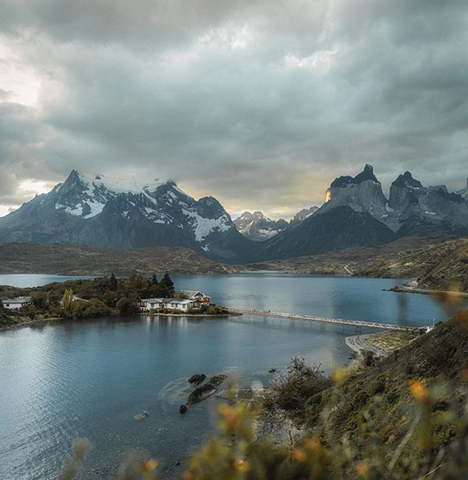
Photo by Tiffen Flight Team member, Lei Deng
When the shutter speed isn’t an issue you should use a polarizer for more dramatic results.
Tip: Don’t use a Polarizer when flying directly into the direction of the sun, as it will have little effect on contrast enhancement. Polarizers perform best when the sun it is 90 degrees to the side of the lens.

Examples of a Polarizer in use. You can see that the polarizer is able to cut through the glare off the surface of the water, allowing you to see further below the surface.

Michael Cassara
When he isn't clicking away on his camera, Michael can be found quoting every Will Ferrell movie, cruising up and down the beach in his Jeep, or just spending some quality with his family and dog, Daisy. As the Marketing Communications Manager at Tiffen, Michael oversees our social media, our ambassador team as well as this very blog! Michael is also an accomplished and Award Winning Wedding Photographer from Long Island.